Lists, classic or compact view

Lists in the CRM offer similar features as known from other applications:

  • Modern "Excel"-like view (classic).
  • Individually adjustable line height in lists, so that text in multi-line fields can be read completely without having to maximize the fields.
  • Display of the sum in the tooltip of the column title for addable columns.
  • Optimized multi-line attribute display (compact).
  • Sorting is also possible in the multi-line (compact) view via a "floating symbol" in the upper right corner.
  • Possibility of grouping. By default, grouping is used in selected lists like the Mailbox, Entry Portal, Chro­nos and "Last used".
  • New lists follow the color scheme. This allows administrators to customize the colors of the list headers, for example.
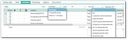
Detail form at lists

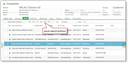
Mainly at activity sublists, you can find an area to the right of the list, the "detail form".

If an entry is selected in the list, you can see the content or details of the activity in the detail form. Detail forms are read-only and display master data. In some detail forms, assignments can be changed, for example, the project assignment. They also contain a menu (three vertical dots next to the subject) for quickly creating follow-up activities or performing object-specific functions, such as replying to or forwarding emails.

Lists, classic

Lists display several records line by line in a two-dimensional table or as a compact list, see below for more. They are always made available if users should receive an overview of several records.

A typical example are the overview lists. There, you can systematically select the records that are indicated by hyperlinks in the master form. Using the mouse pointer, you can change the width of columns and the height of rows, just like in other programs. To sort in ascending or descending order, click on the column header of a field.

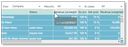
Classic list as two dimensional table

Lists can contain fields into which comments from the displayed records are transferred (e.g., tab doc­uments). If the field length is not sufficient to display the total field contents, click in the field to scroll the content, or enlarge the row to display all of it.

With selected lists, like staff members of external or internal companies, quick filters in the form of quick search buttons (123, A-E, F-J, K-O, P-T, U-Z) are available. This enables you to search faster in lists with a large number of staff members.

Clicking one of the buttons corresponds to loading the filtered records, here by number or initial letter of the name. If the quick search button is reset, nothing is filtered and all records in the list are displayed. It may take some time to load all the entries in the list.

Sorting records in lists locally

You can sort the records in a list alphabetically or numerically in ascending or descending order by means of a mouse click on the column header. This function is a toggle. The first mouse click on the field title sorts in ascend­ing, the second one in descending order. The current sorting is indicated by an arrow in the field title. When sorting several columns (multi-level column sorting), you automatically receive a sorting result that corresponds to that of an SQL select statement with a corresponding "Order By" clause, meaning that the sorting is first done according to the first sorted (clicked) column, then according to the second, and so on. By means of the standard load function (F5), you can cancel the sorting and then start a new multi-level sorting.

Filtering list entries (Quick filter)

Using various selection menus in the lists ("Quick filters"), the display of the records can be filtered, i.e., restricted, independently of the list representation.

Select menus in relation lists

Marking records in classic lists

In the classic list view, you can mark a single record by clicking on the far left in front of the first field of the record. An arrow is shown in the selection field.

You can mark or cancel the marking of several records by holding down the [CTRL] key each time while marking in the same way. Groups of records can be marked in the same way by pressing the [Shift] key at the same time. You can mark all records at once by using the familiar key combination [Ctrl+A].

Note: The list display and the key combination [Ctrl+A] are not supported in system lists like administrator lists.

See also: List of hotkeys

Applying marked records in the form

The Show in form function allows you to display marked records of a list (overview list or sublist of the master form) in the corresponding master form without opening every record successively using its hyper­link. Simply mark several records and click the Show in form function in the function bar.

Scrolling records in lists

In lists, you can conveniently navigate in the loaded data using the mouse wheel.

If a record is selected in the list, the selection is preserved while scrolling. If the list has a vertical scrollbar (many records loaded), the selection is scrolled out of the visible area, just like in MS Excel or Word.

Changing column width and line height in lists

Move the mouse pointer slowly to the horizontal or vertical column boundary line at the edge of the list until it turns into a double arrow. Drag with the mouse button pressed to adapt the size to the cell con­tent.

Shifting column titles in lists

Click a column title in a list and hold down the mouse button to move the column header to the left or right to change the column order. The state of the columns is then stored for this list.

Hiding and viewing columns

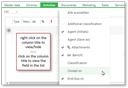
The object menu shows all field titles in the list when the cursor is right-clicked on a column title. Remove the check mark for the title that should be hidden as a column, or set the check mark if the column should appear again.

Adapt columns (fields)

Hint for the admin  
Info

Ctrl + right click on the column title of a list opens the column menu in system mode (internal names). Columns can be shown or hidden in this mode as well. Lists containing identically titled fields in different components can then be distinguished by the internal name for customizations.

In lists, multi-line column titles can be managed. Line breaks in column titles can be specified in the repository by means of the style M and the string \n.

  • Style M controls multi-line.
  • The string '\n' causes a line break.
  • Without this string, there is no multi-line, because there is no automatic wrapping.

Calculation of the column total in lists

Especially lists in which data can be edited, such as overview lists, selection lists, scope of delivery, sales lists etc. are only available as classic lists.

In such lists, values in numeric fields (Integer, Float, Money) can be summed up column by col­umn.  The total is calculated for the selected records and is displayed as a tooltip in the header of the corresponding column. The presentation of the total is language-independent.

Total of the market column values as tool tip

Mark records in any order and place the mouse cursor on the header of the column containing the values you want to total. You can then read the sum of the values in this column from the tooltip at the mouse pointer.

Copying the calculated column total in lists

To be able to copy the total value for further usa, it needs to be transferred to the message bar. Proceed as follows:

  • First focus the list by clicking on it.
  • Now have the column total displayed as described above.
  • While the tooltip is being displayed, press Ctrl+Alt+S to transfer the total value to the message bar.
  • Mark the String in the message bar and copy it to the clipboard.
Info

Admin: Through the environment variable PSC_CFR_COL_SUM, your administrator can switch this feature on or off.

Transferring content

The well-known command Transfer Content, which you can issue from the Extras/Tools top menu, or using the key combination [Ctrl+R], helps you to automatically transfer the content from the field of one column to other fields of the same column.

Persisting a classic list

You can modify classic lists individually using the features above. The state of a modified list is persisted when you close it or shut down the system. Thus, the next time you use the system, the lists reopen with the modifications you made.

Resetting the modification [Ctrl+Alt+R]

Use the [Ctrl+Alt+R] key combination to reset a list's customizations to the default settings, if needed. This is especially helpful if you are unsure regarding your customizations and may be missing fields or data that are simply hidden or have been moved.

Note: There may be lists that are not preserved after they have been customized, especially if fields are hidden or shown in the list by using quick filters and the view of the list has thus been changed. This means that a list can only be persistently modified if it has the same columns (fields) in all its quick filter views. An example is the “Contacts” sublist in the Project folder.

Compact list view

You can select a compact view in lists that support this feature. The list presents the data of a record in blocks.

Such lists can be identified by a toggle button (tab) on the right side of the list. It lets you switch between ordinary and compact list view. The client will remember the view you selected.

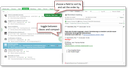
Example of a compact list, activities

Info

Admin: However, the server can set the compact list as the default view in the list definition and thus override the current user’s setting when the dialog is reloaded.

In the process of customizing, the  compact lists feature can be provided for other lists.

Compact lists are read-only. Hyperlinks and toggle functions of fields are supported. Records can be selected, and the list functions can be executed.

The advantages are, in particular:

  • Compact presentation of different data using a minimum of space
  • Different lists with detailed information (right) about the selected record (e.g. activities)
  • Responsive design, no horizontal scrolling necessary
  • Thumbnails for contacts and documents are visible in the list
  • Sorting in multi-line view via a "floating symbol" in the upper right corner
  • Presentation of time spans in a cell, based on a pattern.
Info

Admin: For example, in activity sublists, the pattern used to present “Begins at” until “End/Maturity” has the form “01.10.2017 09:00 - 18:00”. The client keeps the presentation and will adjust it automati­cally according to the time span (within a day, month, year). The automatic display of relative date values such as “Today”, “Yesterday”, “Tomorrow” instead of the date is also supported.

Sorting in the compact list

The sorting needs to be done individually for each list view. By switching to the multi-line view, a floating symbol (flag) appears in the upper right corner of the list. In the flag, the sort field can be selected (Sort by: xyz). Depending on the field type, the sequence display changes to alphabetical or alphanumeric in descending or ascending order.

Selecting in the compact list

In the compact list view, it is sufficient to click on a record and select several records using [CTRL] or a group of records using [Shift].

Opening files directly by their icon

In the lists or even in some fields of various forms showing document records, you can see an icon in front of the Subject. By clicking this icon, the file of the document record is opened by the linked application (e.g. a Word document with Microsoft Word).

In the Tree view of a list, you will see the icon as well, but it has no effect. In this case, you can simply open the document from the right detail form by clicking on the the document’s file name of.

Note: In some rare cases, instead of a visualization, the text "unknown blob type ()" can show up in the mentioned field. This means that the BLOB has been checked in, but there is no viewer for the file type on the system on which the client is running, so the BLOB field can only be saved and retrieved and not displayed. Example: Out­look doesn’t include an external viewer for its MSG format (neither with nor without attachments).