- When selecting the Activity (New) function from the function bar of a contact and creating an E-mail, the input form for emails is opened. If there is an email address in the contact form, click it to open an empty correspondence form.
- Specify a meaningful Subject (for later identification of the record and subject of the email).
- The Status of a new correspondence is Open or Not yet created.
- The logged-in user automatically becomes the sender. If the correspondence was delegated or is processed further, the sender needs to be corrected accordingly because it appears in the mail. A different Responsible can be specified under Additional data. The correspondence will then appear in their Entry portal. The Responsible ... (under Additional data) is always automatically the logged-in user.
- The source contact is initially automatically preset as the recipient (To). If you have assigned a case during the creation, or created the email in the context of a case, the contacts of the case will automatically be provided in the Select recipients selection dialog which you can access using the buttons To, Cc, Bcc. You can further qualify the recipient list now by adding more contacts or removing selected contacts. The email is assigned to every recipient as an activity.
- Add Attachments as needed. Via the corresponding button, you can assign attachments from the document management to the email. Attachments can be documents that are already available in the system, or they can be created in the system via drag and drop onto the Attachments field.
- You can actually start writing right away in the View, because JustRelate CRM has automatically used a standard Template that was preset under My data.
- If you want to create the email for later use, enter a due date under Additional data to be reminded of the email. By default, the due date of an email is predated to 60 minutes.
- Enter a comment for yourself as needed under Additional data.
- Click OK or save the record.
- The correspondence can now be found as an activity in the Activities tab of the source object, including dispatch type and subject.

How to create an email
Note: If you want to transfer an email directly from the modal window to your Groupware (e.g. MS Outlook), do not click Save but the Save and create button instead.
If the recipient is involved in a marketing action, a query about the case and the milestones to be assigned will follow when saving. See also: Attendee status and feedback.

Attention: The sender of the sent email is always the person from whose groupware e-mail account the email was sent. When the email is checked in, the "true" sender is always recorded for the email. It does not matter whether you possibly entered a different sender.
Note: For assigning contacts to emails, regardless of the button you use, you can change the type (To, Cc, Bcc) at any time in the target list of the selection dialog (selector at the Type field).
Deleting the template text
If necessary, you can delete the entire predefined text and select a template in the Template field that you know is intended for the desired email. When changing the template via the selection dialog, you will be asked if the text should be replaced by the template or if the template text should be inserted above the existing text. After confirming, the text is deleted or overwritten as soon as a template is selected, or the template text is inserted at the beginning of the already existing content.
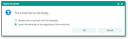
Using a template if content is already in text field
See also: "Operating in the CRM", editing text using the HTML editor
Inserting a signature
If you have maintained your own signatures, place the cursor at the position where the signature should be inserted and click the "insert signature" button (the icon next to Use template). Then select the signature. If the error message "no signature" appears, please see Maintaining your own data and configurations.
Note: If a signature appears automatically together with the template, you can of course overwrite it.
Template-based replying and forwarding
In previous JustRelate CRM versions, it was not possible to reply to or forward emails using a template because the use of a template was only possible with an empty text field. This meant that the original text was inevitably lost.
Now you can use a template when replying or forwarding and have its content inserted before the original text. For this, when selecting a template via the Template button (but not when selecting it via the drop-down), a corresponding message appears (see above), and you can either have the text replaced with the template, or the template inserted at the beginning of the text.
Inserting a template if content is already in a text field
See also: How to create your own templates using placeholders: Correspondence templates with placeholders
Structured template selection of correspondences
The template selection is displayed in the tree view, structured by area and topic. The tree is searchable, a list view is not offered. You can change the structure in the CRM template management.
The selection is filtered and includes all released templates you have access to, as well as your own templates (of which you are the owner) that have the In development status.
There are buttons for restricting the templates to those marked as favorites, or to those with the user’s language.
See also: Templates, Simplified correspondence template management for end users