It is always advantageous if you first capture the company, and afterwards the contact persons associated with it. If the company has already been captured, you can enter a person directly at the company. Capturing external persons or companies manually differs only in a few points related to the relation between the company and a person.

Capturing contacts manually
First the company, then the contact person
Note: For capturing contacts, you should definitively use the assistants for Name and Address to enter unique names and addresses for later research and correspondence. Pay attention to a unique and correct convention in the Save as field. This entry then corresponds without exception to the Name field in all selection dialogs.

Admin: Your administrator can set or adapt the default for "Save as" with environment variables. See Contacts.
See also: In the context of the address and name fields, you can find more information in the section Correspondence fields according to DIN -the German Institute for Standardization- 5008
- Open a contact form (company or person).
- If it is empty, please fill in the general contact specification in the header and in the Master data tab.
- If it is not empty, open the New command (Ctrl+I) and in out the general contact specifications in the header and in the Master data tab.
- With persons, you can enter form of address first name last name of a person directly in the Name field. However, we recommend to use the name assistant, in particular in case of foreign names.
Note: When you enter a person, after you entered the full name, the form of address will be added automatically if the system finds at least one identical name in the database. This works for the name field and the name assistant. This feature can be disabled via the PSA_PRS_FND_SEX variable. It is ON by default.
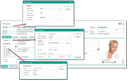
Capturing a person as a contact
You can create an individual address for every selection. In the Additional data subform, on the Addresses tab, you can find all captured addresses in the overview.
See also: International address entry
Here you can use a selected (marked) address, which doesn’t need to be the main address, directly for a correspondence. If you have a JustRelate CRM licence for geointegration, you can also locate the locations of the individual addresses via GoogleMaps here.
Note: Please use the address assistant (Address button) to have access to international address patterns if needed.
As an option for entering the address, you can use an integrated zip code database (for Germany: Deutsche Post) that suggests cities or zip codes and matches them to the street name.
Enter only the local post address here. For correspondences, the contact name and the department are taken from the corresponding form fields and must therefore not be entered in the address field.
- Activate the mail checkbox (post flag) for the address showing the postal address. If necessary, confirm the changes in the Envelope window field under Additional data/Addresses.
- Enter all communication data (phone, fax, mail...), and in the Preferred communication type field also the preferred communication type.
Admin: JustRelate CRM can compute an email scheme that is used automatically when creating new employees. The scheme is computed automaticly if the variable PSA_PRS_USE_EMA_SCM is switched on.
- If necessary, check the Form of address (without comma) and Envelope window in the Additional data/Addresses subform.
- If necessary, further relations are later displayed and can be created in the Additional data subform. Among other things, you can represent contact relations and the corporate structure here, or provide further properties and commercial data, such as payment and delivery terms, a VAT number and trade registration number.
Admin: Via customizing, a default value for the VAT can be preset for the PSA_CON_STR.SAL_TXT_IDN field
.
- In the Additional data/Conditions/Financial accounting data subform you can maintain the ID number field (type = text) if needed. Enter here a unique number (e.g. DUNS, Crefo) as references to external databases or enterprise directories for determining creditworthiness.
- Provide all the information needed for contacts, and save the record!
Banking details
§ GDPR: Please check whether the bank data is for a person (GDPR, data protection) or a company. Enter and maintain bank data for the New bank details assistant via the Contracts/Banks administrator table.
Only after this, you are able to use a bank in the banking details of a contact. Please always use the assistant to add further bank data.
Phone and fax number
The assistants for phone and fax are helpful for quickly entering phone numbers, because the country code of the contact address that has the post flag set is automatically entered into the form (if the country is present). For contacts that have the same telephone main line with different extensions for phones and a fax, a hyphen can be added as a separator. Then the assistant automatically places the main line number before the separator in the field for the fax number.
Note: In the assistant, the country code can be determined independently of the country of the main address by changing the country in the Country / Region field. However, the country code does not change automatically if the country of the postal address changes.
If the country of the address changes, empty the phone field and restart the assistant, so that it takes the country codes from the database.
The formatting of the phone number is adopted from a Google library according to country-specific rules for the presentation to be uniform. The last minus or a space character at the end is retained to be able to specify an extension number.