Contact data resolving

As an administrator, you should check contact data saved in the CRM regularly for duplicates and delete or consolidate them.

All master records with duplicates are indicated in a list. You can join the duplicates with the mas­ter record in the list. For this, the Duplicate management menu item is available in the Administration/Tools menu. The test mechanism used for the check is identical with the duplicate check performed when a contact is created, and works with the preset search depth 2 (no matter whether a different search depth is set via the PSA_QUE_DEP_ *  environment variables).

Attention

Attention: Contacts that are in a common structure must be checked separately and can be manually marked as duplicates.

Duplicate check of structured company contacts and contacts with history relations

Company contacts are usually structured (departments, industries etc.) and would therefore very often be marked as duplicates, because subsidiaries on a lower level often have the same name as the mother company. If company contacts to be checked are in the same structure, the automatic duplicate check does not identify duplicates among them. However, in such cases, you can mark them manually as duplicates.

JustRelate CRM also does not mark contacts as a duplicate that have a history relation to each other.

Running a duplicate check

  1. Open the person or company list using the Administration/Tools/Duplicate management/Check menu.
    Note that this duplicate check refers to external contacts only.
  2. Load all or only a desired subset of records (determined by a search) into the contact list.
  3. Execute the Duplicate check function. You can have all marked (Selected) contacts checked, those that were modified in a specific Period of time (e.g., all contact data entered in 2022), or All in the list.
  4. Select in the Duplicate weighting dialog an evaluation level (lax, medium, strict).

After the check, the system has internally marked all contact records that appear to be duplicates. If a user then opens the contact overview before cleaning up the contact data, these records are already marked in color.

Ad-hoc list for cleanup

The administrative contact cleanup list has a feature for transferring contacts from an ad hoc list. Only duplicate contacts are taken from the list, and depending on the cleanup list, either only companies or only people are taken over. This allows an account manager to collect contacts to be cleaned in one or more ad hoc lists and submit them to the contact administrator for a cleanup.

Marking duplicates manually

It is possible to manually mark two identical contacts as a duplicate or a master. The system can then clean up these records. The master will ultimately remain the active record that will be merged with the duplicate (see below, Resolving contact data).

  1. Open the person or company list via the Administration/Tools/Duplicate management/Check menu.
  2. Click Manual assignment in the function bar.
  3. Click the Master button in the dialog, and find in the selection dialog that opens the contact record you want to make a master.
  4. Click the Duplicate button in the dialog and find the contact record in the selection dialog you want to assign to the master as a duplicate.

Afterwards, you can start resolving duplicates.

Resolving contact data

If the system finds relevant records after a duplicate check, it will display a corresponding message, and you can open the resolving list immediately.

  1. Open the Persons or Companies result list after the duplicate check via the Administration/Tools/Duplicate management/Resolving menu.
  2. Load all relevant records into the list.
  3. The list now shows the contact records with duplicate attributes. The oldest record (referring to its creation date) of duplicates belonging together is automatically interpreted as the master by the system and displayed in color (green). The remaining records are interpreted as proba­bly inadmissible copies (duplicates), and the differences compared to the master are highlighted.
  4. Check the duplicates and the master. You can use the following correction functions from the function bar to consoli­date the contact data inventory.

Correction functions

Set master

Makes a marked duplicate the master. The old master automatically becomes the duplicate.

Reset

Resets the duplicate identification. The record is removed from the set of duplicates and is regarded as a regular contact again. On the next duplicate check, this record will again be marked as a duplicate.

Consolidate

Consolidates marked duplicates and the master, meaning in detail:

  1. All empty fields of the master are set to the entries from the duplicate. The address types are checked individu­ally and matched in the same way.
  2. All relations of the duplicate are redirected to the master.
  3. All marked duplicates are ultimately deleted from the database.

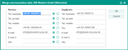
If data is present in the same significant data fields of the marked duplicates as well as of the master record, the “consolidate” function opens a comparison dialog showing the most important contact attributes.

  • Consolidate contact-communication data
  • Consolidate address data

Here, you can specify the data the master should contain after the consolidation by correcting the data in the master area to the left. You can also mark which data of the duplicate record should be accepted in the master record using the radio buttons. Finally, confirm your choices with OK. If the comparison dia­log is cancelled, the duplicates and the master are still consolidated, but no data is passed to the master.

Consolidating contact-communication data

Attention

Attention: All the possibly many other important fields need to be checked individually. If necessary, open and edit the record prior to executing the "consolidate" function.

Reset permanently

Resets the duplicate identification. The record is removed from the set of duplicates and becomes a regular contact again. Afterwards, the record is never again marked as a duplicate. This pro­cess can be undone using the Administration/Tools/Duplicate management/Resolved duplicates menu.

Reset resolved duplicates again

A record that was permanently reset in the Resolving list can be reactivated for duplicate checking.

  1. After resolving, open the list using the Administration/Tools/Duplicate management/Resolved duplicates menu.
  2. Load all records into the list. The list now shows all adjusted contact records.
  3. Select one or several records that you would like to reactivate.
  4. Click the Reset function in the function bar.

The record will be marked as a duplicate again when checking for duplicates the next time.