
After logging in, select the mailing type from the navigation to create or work on a mailing. If you initiated a mailing via JustRelate CRM, you already have an Automations mailing with recipients. Simply locate it in the overview list, and click it.
Creating a Mailing and Adding Recipients
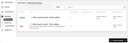
Otherwise, click the “Create mailing” button at the bottom right and select the type needed, “Marketing” (with or without follow-ups), “Follow-up”, or “Transactional” for automatic confirmations or notifications, e.g., after subscribing to a newsletter. You now have a new mailing, which is in the “Draft” state. You can add recipients, but also do this later and first specify the mailing details or provide the template by clicking the corresponding tab further up.
Adding recipients

For marketing mailings, you can combine the available recipient sources in any way you like to create the desired target audience.
For follow-ups and transactional mailings, no recipients can be specified because they are determined automatically.
Topic subscribers as recipients
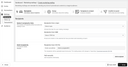
On the “Recipients” tab of the new mailing, the “Topic” dropdown lets you select the topic of your mailing, which adds the profiles subscribed to this topic as recipients. You can do this later, too, when you edit the mailing. Only one topic and the subscribers associated with it can be assigned to a mailing.
If you don’t want topic subscribers to become recipients of your mailing, don’t select a topic, or click “Reset” to unselect the currently selected topic.
Assigning a topic to your mailing causes the topic subscribers to be added as recipients.
Recipients from a CRM list
As a JustRelate CRM user, you can add recipients from a CRM person list to your mailing.
You can create and manage static and dynamic person lists via JustRelate Home.
Uploading recipients as a CSV file
In the “Recipients” section of a mailing, you can also upload a CSV file containing the recipients of your mailing. You can upload as many recipient lists to a mailing as needed, even after the mailing was sent out. Automations combines those lists into one, removes duplicates, and makes sure that no email is sent more than once to any recipient.
CSV files are uploaded asynchronously, i.e., in the background, which is indicated by the “Importing” state of the mailing concerned, as well as a progress bar on its details page. While a recipient list is being imported, no mailing can be scheduled, sent, or deleted.
CSV file format
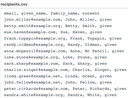
A valid CSV file is UTF-8 encoded and has a header line in which the field names for the recipients following in the rest of the file are specified. There, each line represents a recipient entry consisting of field values in accordance with and in the order given in the header line.
Automations has several predefined fields: company, consent, email, family_name, gender, given_name, middle_name, name, phone_number, salutation, url. Additionally, custom fields can be used in the CSV file. Automations identifies them by their name prefix, custom_. The email and consent fields are mandatory. An email will only be sent to a recipient if the value of their consent field is given.
Verifying the recipients’ email addresses
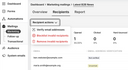
When sending marketing emails and follow-ups, it may happen that a recipient’s email inbox no longer exists or is unable to receive emails.
Recipient actions
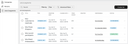
Using the recipient actions for a mailing, you can verify the recipients’ email addresses and then move invalid email addresses to the blocklist, or remove them from the mailing’s recipient list. This can reduce the number of bounces after the mailing has been sent.
After the check, the results are displayed in the “Email address verification” column, with individual addresses classified as “uncertain”, “valid”, or “invalid”.
If a verification result is “uncertain”, the mail server concerned does not allow for a reliable assessment of the validity of the email address, or it belongs to a domain that accepts any email usernames.
Viewing and manually removing recipients
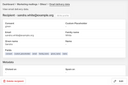
After adding recipients to a mailing, you can switch to its “Recipients” tab for sanity-checking the profiles originating from the selected topic, as well as the uploaded recipients. You can see here whether the recipient list appears to be complete, or if it includes recipients you would rather want to be removed.
You can click a profile or uploaded recipient to view its details. As long as an uploaded recipient hasn’t been processed in the course of sending the mailing, you can directly delete them here from the mailing. Topic subscribers can be unsubscribed via their profile.