
Every form is made up of a form widget and one or more form input field widgets (such as text boxes, selection elements, etc.), as well as a form button. Form controls cannot be placed outside a form widget, but inside a form widget you can combine them with any other content or structure widgets, e.g., images, text or column widgets and the like.
Setting Up a Form on a Website
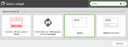
Adding a form to a page
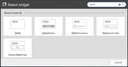
Adding a form field to a form widget
Mostly, forms don’t take up all the available space on a web page, but are placed in boxes or columns. You can add often-used forms to the widget library to have them available where needed.
To add a form to your website, all you require is a working copy in “Edit” mode. Then, place a “Form” widget on the page concerned, and add the desired form control widgets to it. Form control widgets are multipurpose in the sense that you can specify in such a widget’s properties what it should capture. For an input field, this would be the name or e-mail address of the website visitor, for a checkbox the action that should be triggered if the checkmark is set, etc.
See the Web Builder User Guide for detailed information about the Web Builder’s editing interface and how to use it efficiently.
Form properties
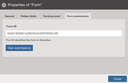
Form properties
The standard form widget of a website based on the Portal App has several properties. They let you specify, for example, the transactional on-site messages to display, e.g., after submitting the form. You can also define hidden fields, and specify the pieces of data relevant to event tracking, e.g. the form’s conversion ID or its category.
The individual forms are automatically assigned an ID by which Automations identifies them.
After adding a form and form controls to a page, and adjusting the widgets’ properties according to your needs, you can register the form or view the submissions made so far. For this, select the “Form submissions” tab in the form widget’s properties and click “View submissions”. This takes you to Automations where you can register the form and thereby set it up – if you haven’t already done so –, or view the form data that has been submitted by the visitors to your site.
The properties your form and form control widgets actually have may have been adapted to your company's marketing procedures.
Form control widgets
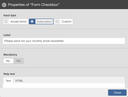
Checkbox properties
As mentioned, next to the form widget, a Web Builder application features several configurable widgets for capturing the visitors’ input. One of them is the form checkbox widget by means of which a visitor can accept terms, subscribe to a topic, or confirm a custom action. The “Subscription” option refers to the topic specified when registering or configuring the form concerned. Make sure to align the widget's label and help text to this topic.
If a visitor ticks such a “Subscription” checkbox and submits the form, Automations creates an email-address-based profile for the visitor (or updates it) to persist the subscription and the consent given through it.
Profiles allow you to manage the various kinds of consent given or revoked by individuals, and to add recipients to mailings on a specific topic.
If a visitor didn’t tick the checkbox, no profile is created or updated.