The “Settings” area allows administrators to assign access permissions for the various functions of Home via teams and roles. Also, the tone of voice of your brand can be set here. You can open the “Settings” area by clicking the  button at the top right.

Settings
Users and teams
This section in the “Settings” area is divided into two tabs, “Users” and “Teams”.
Managing users
The “Users” tab lets administrators manage the users that have access to the selected organization. You can use the search input box above the list to filter the users by their name or email address.
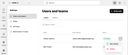
“Users and teams” tab in administrator’s “Settings” area
To invite someone into your organization:
- Click the corresponding button at the top right.
- In the dialog that pops up, enter the new user’s email address, and
- select the teams to which the new user should belong. Then,
- click “Send invitation”. The new user will be sent an email containing a link for accepting the invitation.
Using the menu button to the right of a list entry, you can manage the user’s teams after clicking “See details”, or delete the user.
Managing a user’s teams
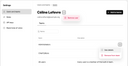
After clicking “See details” for a user, the list of teams the user is a member of is displayed. Using the menu button to the right of the user name at the top, you can delete the user concerned. This will open a dialog for confirming the action.
To add the user to further teams, click “Add to teams" at the top right. This opens a dialog for selecting the teams the user should be added to.
In the list of teams the user is a member of, each entry has a menu allowing you to manage the team via “See details”, or, except for “All users”, to remove the user from it.

With the “All Users” team, you can automatically grant specific basic permissions to every new user.
Managing teams
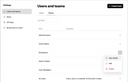
Teams are at the heart of the permission system in Home. They not only define their members’ permissions regarding the various Home products, e.g., the mode of access to the Web Builder or Automations, but also access to Email Builder projects via roles.
If you are an administrator, you can select the “Teams” section in your settings to have the list of teams displayed, and then manage them individually using the respective menu to the right:
- See details lets you manage the team’s settings, i.e., its users and permissions.
- Edit allows you to change the name and description of the team concerned.
- Delete team irrevocably removes a team from the system (after confirming).
Team settings
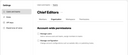
A team is defined by its members and their set of permissions, the latter consisting of organization, workspace, and Email Builder project permissions.
- Organization permissions include user management and organization configuration permission.
- Workspace permissions cover access to functionality in JustRelate products such as Home, Web Builder, or Automations.
- You can assign Project permissions to a team via roles. See below for details.
The permission names should be self-explanatory. However, if there are questions, don’t hesitate to contact JustRelate support via the  button in the upper-right corner.
Defining roles
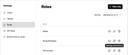
A role is a named set of permissions by means of which you can grant teams access to Email Builder projects.
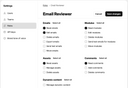
You could, for example, define a role named “Email Reviewer” with read and write permission for emails, but only read permission for assets and modules. Afterwards, you can assign this role to any team on a per-project basis.
To define a role, proceed as follows:
- Click the “New role” button at the top right.
- In the dialog that opens, enter the name of the new role, and click “Create”. This adds it to the list of roles.
- In the list of roles, click the pen icon to the right of the role concerned to manage its permissions.
- This opens the permission selection page for the role, which is divided into several permission sets: one for emails, another for modules, and so on. To grant all permissions in a set, click “Select all” next to its title.
- Once you have assigned the desired permissions to the role, click “Save Changes” in the upper-right corner. The role is now ready to be assigned to teams.
Brand tone of voice
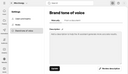
“Brand tone of voice” tab in administrator’s “Settings” area
In the “Brand tone of voice” section of your settings, you can set the tone guidelines that the AI assistant included in every product of the JustRelate platform should take into account when adjusting or translating your written content.
You can enter the tone description manually or have it extracted from a document after switching to the corresponding tab above the input field. You can then have the description reviewed to receive valuable suggestions for improvement.
For the assistant to effectively support your communication goals, provide it with a detailed description of the aspects you want it to consider when asked to generate, optimize or translate your texts, like so:
# Personality
Quietly confident, warm, and considered. Friendly without familiarity. Refined without distance.
# Audience Relationship
Addresses customers as discerning, informed individuals. No pressure, no hype. Trust is earned through clarity, consistency, and respect.
# Core Focus
Quality, craftsmanship, timeless design, and sustainability as long-term commitments—not trends or selling points.
# Language & Style
Clear, precise, and calm. Concrete descriptions over superlatives. Subtle storytelling instead of sales rhetoric. Polished, natural phrasing.
# Avoid
Hard selling, urgency, exclusivity signals, buzzwords, and exaggerated luxury claims.