Projects are the topmost organizational entities for managing emails and email modules based on the Email Builder. Click the “New project” button to the right to create a project.

Projects
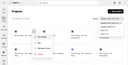
Using folders, you can group your emails and modules according to any criteria or aspects that help you keep track of them, e.g., their language version, target group or purpose.
In the overview, you can sort the projects alphabetically, or by the date they were last touched. Additionally, you can filter them by their status.
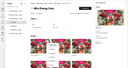
Clicking a project opens it, and also causes a project navigation bar to be displayed to the left, where the selected project is expanded. As with projects in the overview, their individual contents and that of their folders can also be sorted and filtered.
Projects consist of emails, modules, and dynamic content. Emails and modules need to be contained in a folder.
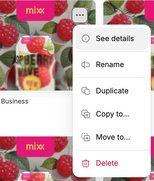
Folders as well as emails and modules have a “More” button at the top right. Clicking it, opens a menu offering various actions:
- See details opens a pane on the right-hand side showing the name of the user who created and most recently updated it, as well as the corresponding date stamps.
- Rename lets you rename the item.
- Duplicate immediately creates a copy of the item in the same folder.
- Copy to… and Move to… let you select a target project or folder to which the item should be copied or moved.
- Delete opens a dialog for confirming the action, and then deletes the item irrevocably unless the action is canceled.

Projects are independent of each other, meaning that inside a project you cannot use modules or media from any other project. However, there’s a default project, “Common Board”, whose resources are accessible from within any other project.
Thus, giving editors access to the “Common Board” enables them to access its modules and media from within the Email Builder, regardless of the project they are working on.
Creating a project
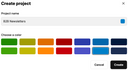
To create a project, click the “New project” button close to the upper right corner of the project overview. A dialog will open that lets you specify the project’s name and color.
The project description is made available to the AI assistant built into the Email and Web Builder, and is additionally used when searching for content in your Home portal. The color you specify will also be assigned to the project folders created later, making it easier to find the project in the overview.
Finally, click “Create” to have your new project added to the overview.
You can configure access permissions for a project at a granular level. See Managing project access for details.
Creating and using folders and their content
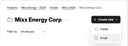
After you’ve created a project, clicking the “Create New” button lets you add and name a folder or an email. For a new email, the Email Builder is opened, so you can start composing the email right away.
The Email Builder features an intuitive user interface for creating and editing content, managing assets, etc. See the Email Builder documentation for details.
To return to your Home portal, click the Email Builder’s “Back to Home”  button at the top left. You will then find a corresponding item representing the email in the folder you had chosen. Clicking this item opens the corresponding application again.