Creating, Registering and Configuring an Automations Form

There are two ways to create a form. You can either create one in Automations by clicking the “Create form” button at the bottom right of the “Forms” section, or register the form on your Web-Builder-based website. For the latter, open your form widget’s properties, and click “View submissions” on the “Form submissions” tab.

Either way, the dialog you are then presented with lets you specify most of the relevant properties of the new form. You can complete the form settings later on the form’s “Details” tab.
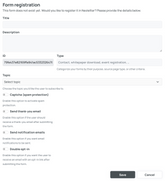
Automations identifies a form by the ID that is automatically assigned to it on creation. The purpose of the Automations form ID is to connect the actual website form to its backend counterpart in Automations. 

It's a good idea to give forms a unique and speaking title and a concise description, so you and your colleagues can spot any of them quickly in the overview list as well as recall a form’s purpose.

You can specify a form’s type, and then use it as a sort criterion in the overview, which makes it easier to find a specific form. However, the main purpose of the type is to trigger automation in some other tool, such as a CRM. JustRelate CRM, for example, can be set up to retrieve the most recently submitted form data and process it differently depending on the form type.

As detailed in Setting Up a Form on a Website, you can add a checkbox of the “Subscription” type to a form, and then specify for it the topic the subscription refers to.

Also note the “Captcha” option for spam prevention. If activated, Automations expects a Google reCaptcha or Friendly Captcha to be present in your form, as well as a secret captcha ID to be specified.