Resource planning in the planning board

Resource planning

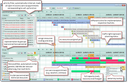
The graphic planning table offers a clear presentation of the missions and resources to the staff members involved in the service process, and allows you to plan graphically.

  • Creating service appointments and set their dates
  • Assigning personnel and technical resources, for example service technicians and vehicles, by dragging and dropping them to an appointment (mission)
  • Grouping resources and finding them by their properties or skills
  • The utilization of resources becomes visible immediately. Conflicts are automatically reported.
  • Appointment release via a status (in planning, resources assigned, released)
  • Integrated interface for routing

Functions in the context menu

  • Open the activity form
  • Delete all resource assignments (for yellow bars)
  • Open service order
  • Release (for yellow bars, also checks for conflicts)
  • Reset release (for green bars)
  • With resources: Show appointments on a map (the appointment period is preset by the planning board, and is queried)

Information in the tooltip

  • Appointment properties
  • Assigned resources
  • Service order

Selection of the time window

After opening the planning board, the system sizes the time window. Afterwards, the time window can be set using the functions in the toolbar.

  • When selecting the time window via the "From... To " time fields, the search criteria of an active fil­ter are preserved, merely the time condition is overwritten.
  • The zoom functions only change the view, but not the amount of data in the appointment list.
  • The time window can be shifted using the arrows above the timeline.
  • Supporting key functions are: [<-], [->] and [Ctrl+<-], [Ctrl+->] for shifting, [Num+], [Num-] for zooming in or out.

Synchronization of the time window

After updating the time window in the active list, the corresponding inactive list can be automatically or manually synchronized in addi­tion to the active list.

You can manually synchronize the time windows using the synchronization button in the toolbar.

Show completed activities

Optionally, (menu: Options) completed activities can also be displayed in the planning board. As in the Team calendar, they are dimmed. In the utilization beams on the resources, completed times are then also considered.

The time window for completed activities depends on the current display (day, week, etc.) of the plan­ning board.

Dynamic grid

For working conveniently with appointments, a dynamic grid is available to you. It lets you coordinate appoint­ments in sensible, meaningful periods of time. The length of the time periods depends on the selected time window, with no less than 15 minutes and no more than two weeks.

Viewing options (grid lines)

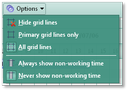
Via the Options menu, you can enable all separator lines or only main separator lines, or hide them all.

Considering the working hour model

Working hours options

The planning board uses the data of the global working hour model. To identify it, four variables, PSA_WRK_ …, are provided, additionally in the form of PSA_GLB_WRK_. These global variables must not be overloaded.

The presentation of non-working hours according to the working hour model can be controlled in the Options/Always show non-working time menu. On the time axis, non-working hours always have a grey background.

Setting Allways show non-working time to inactive causes non-working hours to be only made visible if appoint­ments (start, end) lie beyond the working hours.

If you set both options to inactive, an automatism will take effect that compares planned appointments and checks whether these are sufficient in non-working times to automatically hide or show non-working times.

Creating mission appointments in the planning board

From the planning board, you can create service mission appointments not related to an order (toolbar: New/Service action). Start/end are preset, Type = Service appointment, release level = in planning, the attendee list is empty.

Access to protected activities

For proper planning, the relevant data of the service technicians' activities that cannot be read by the planner must also be displayed. The system determines the beginning and end time for these activities and displays them below the respective contact including the mission bar. However, the information itself is hidden (****).

Colored icons at the bars

Info

Admin: You can switch the extension on or off using the PSA_CHT_RSC_SHO_ICO variable that defaults to "y" in the standard. The variable PSA_CHT_RSC_SWP_PRP controls the color- and Icon display:

n: release level = bar color, appointment type (subtype) =  icon; y: appointment type (subtype) = bar color, release level = icon.

The required colors and icons can be maintained in the Activity subtype and Activity release level administration lists.