
When a technical issue arises, a well-structured support ticket can considerably speed up it’s resolution. Providing precise, detailed information enables the support team to better identify the problem, reproduce it quickly and then define the real need while reducing unnecessary exchanges. Here’s a practical guide to help you write a clear and complete ticket or request.
Creating a support ticket
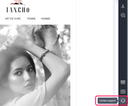
We recommend contacting the support team directly from your email by clicking on the headset button at the bottom right of the Designer. This will enable us to access your email directly and process your request more efficiently.
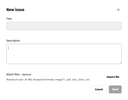
1. Specify the title of the request
Enter the title of your request, capturing the most relevant aspect of the issue you encountered.
2. Describe the context and environment
Describing the context in which the problem occurred is essential. The more specific the details provided, the easier it will be to identify the source of the problem.
- Email or module concerned: If you don't create your ticket directly from the relevant email, please provide the exact URL of this email.
- Environment: Specify where the problem is observed, for example: The problem appears in the Email Builder, or when sending an email test through the Email Marketing Solution, or on a specific email client (e.g. Outlook, Gmail, mobile). If the problem is on a mobile application, please specify this as well.
- Version: Specify precisely the version of the application or software used, including the version of your browser or operating system if relevant. If you have sent an email test, please also specify the e-mail address used (Gmail, Hotmail, business address, etc.). This information will enable us to better understand and reproduce the test conditions.
3. Specify the steps leading to the problem
So that the support team can reproduce the same behavior, describe the actions performed before observing the problem. Here are a few tips:
- List the steps one by one, in chronological order.
- Be as precise as possible (e.g. “I clicked on [button name] after selecting [option name]”).
- If possible, capture a video of your screen to better illustrate the problem.
4. Set the observed result
Explain precisely what happened unexpectedly. This may include:
- Display problems:
- Images or buttons not visible on some webmails.
- Incorrect rendering on mobile messaging apps (truncated text, moved elements).
- Differences between the display in the Email Builder and the real email environment.
- A specific error message: If you receive an error message, copy and paste its exact content or add a screenshot. (to add a screenshot, see point 6 of this article).
- Abnormal behavior: For example, an inaccessible feature, a crash or an unexpected closing of the application.
5. Set the expected result
Clearly state the expected behavior. This will allow the support team to understand the gap between the achieved result and the expected result. Here are some examples:
- “The email should display correctly on all webmail and mobile messaging apps.”
- “Images and buttons should be visible and correctly positioned.”
- “Text should not be truncated and elements should not overlap.”
6. Attach a screenshot and submit the request
Optionally attach a meaningful screenshot, then click the “Send” button to submit your request.
Once the request has been sent, you will receive two emails, a confirmation email of sending the request and an email inviting you to send us (further) attachments (examples: screenshots, videos, other files) in order to illustrate more precisely the problem you met.
Additional information
Do you urgently need assistance?
Feel free to contact us by phone on +339 72 44 60 91 to explain your problem in detail. The support is available from Monday to Friday, from 9:30 am to 06:00 pm (CET).