In this article you will learn how to integrate Actito variables and code blocks into your emails. Please also read the article on using variables in the Email Builder.

Integrating Actito variables and code blocks
See also the Actito documentation.
1. Unsubscribe link
To add an unsubscribe link, add a text element (with the content of your choice, for example simply “Unsubscribe”). From the “Styles” tab of the design pane, access the Link field in the “Link” category of this text element, and insert the variable ${unsubscribe}.
2. Mirror link
As for the unsubscribe link, from the “Styles” tab of the design pane in the “Link” category, add the variable ${WebVersion} to the Link field of a Text or Button element.
3. Text based-customization variable
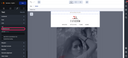
Here is the syntax of an Actito variable: ${my_variable}
For example, to display the first name of a contact, you could use the ${firstName} variable.
You can insert text content present in the database by taking the corresponding variable each time and applying the Actito syntax. Simply insert this variable into your texts.
4. Gender-based customization variable (Title)
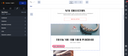
In Actito, you can define the value of the ${genderTest} variable according to the gender of the email recipient.
With the Email Builder, all you need to do is place this variable in a text field, as described above.
For example, if your ${genderTest} variable is “Dear Sir” for a male recipient and “Dear Madam” for a female recipient, you can insert the two ${genderTest} ${lastName} variables into a text field to obtain “Dear Mr Dupont” or “Dear Ms Dupont”.
5. Link to a form
As with the mirror link, if you would like to redirect the recipient of your email to a form. From the “Styles” tab in the design pane, access the Link field in the “Link” category of a clickable element (such as text, a button or an image) and insert the variable ${form} in the Link field.
6. Display conditions
Conditions and associated criteria are created in Actito as described in their documentation.
Once created, insert your conditional HTML blocks into the Email Builder using the Code element.
Example of inserting a conditional HTML block :
Here, we want the HTML code for a clickable image to be present in the email when condition1 is met.
To do this, insert the block of HTML code below in a Code element, where you want the clickable image to appear.
<span data-actito-if=${condition1} align="left">
<a href="https://www.actito.com/en-BE" target="_blank" style="border:0;"><img src="https://pbs.twimg.com/profile_images/1194974678969917440/HWjtzNpP_400x400.jpg" height="23" class="resize320" style="display:block; border:0; width:100%; height:auto;" alt="" /></a>
</span>
Example of adding a condition to the content of a section:
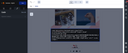
Here, we want all the content of a section to be present when condition2 is met.
To do this, insert a Code element at the top of the section with the opening condition tag:
<span data-actito-if=${condition2} align="left">
Then insert a code element at the bottom of the section with the closing condition tag:
</span>
7. Loop customization
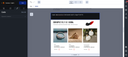
To create a custom loop, create a block containing the information to be displayed in the loop, then frame it with two code elements. The first will contain the opening declaration of the loop, and the second the closing declaration.
For example, to generate the list of products contained in a basket that has been abandoned, we would have :
A Code element to open the loop:
<div data-actito-each="purchase:${purchases}">
The content used to display the products and associated prices (integrated using two customization variables entered in two text elements):
${purchase.item} = the name of the item
${purchase.price} = the price of the item
A Code element to close the loop:
</div>
8. Call a content block
You can call up a block that has already been set up in Actito (as described in the Actito article).
Once the block has been created, you can call it up in the Email Builder using a code element, like so:
<span data-actito-content="@{content:${librairie}#${offre2}}" data-actito-link-id="link_2" data-actito-content-default="true">This is the default value if missing content block</span>
Your content block has a very specific identifier, so you need to indicate it in the data-actito-content attribute (here ‘@{content:${librairie}#${offre2}}’).
If the block cannot be displayed or does not exist, you can set a default value.
See also the documentation for Actito variables and customization.